|
Getting Started
Note: You will need software to enable your
connection. You will need two things in particular: MacTCP (this is included in your
system software if you have version 7.5 or higher), and a PPP client (some examples are
FreePPP, and MacPPP (ConfigPPP).
1.Once you have installed your PPP client, the
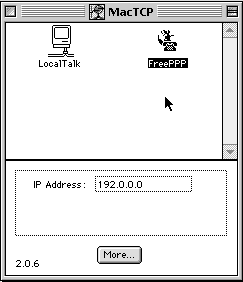
first step would be to setup MacTCP. Open your MacTCP control panel by going to
"Control Panels" under your apple menu. Once the control panel is open, make
sure that "PPP" is selected in black rather than Localtalk. Click on the button
labelled "more".
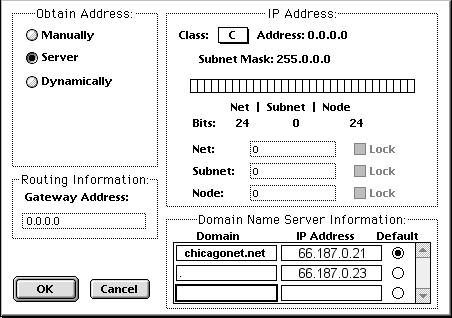
2. Once you are into MacTCP you will notice in the
upper right hand corner the words "obtain address". Check the bullet next to
"Server". Next to the obtain address field you should notice the "IP
Address" field. The class should be set to "C". Under the IP Address field
you will notice the Domain Name Server Information. Under the "Domain" field
input: chicagonet.net. Next to chicagonet.net in the "IP Address" field input
the numbers: 66.187.0.21 Make sure that this is set to the default. Next, under
the Domain field under the chicagonet.net entry, input a period. Under the IP Address
field next the the period input the numbers: 66.187.0.23 If you become confused
about setup at any particular time please refer to the picture below.
Note: You will need to restart your Macintosh for your changes to
take effect.
Congratulations!! you've setup MacTCP!! Now for the second
half....
Config PPP
The following instructions are for those using Config PPP. Config PPP is
a somewhat old ppp client but it will still make a reliable connection if configured
properly. Configuration of Config PPP is more difficult than FreePPP (which is why we
recommend FreePPP). If you wish to continue using Config PPP please follow the
instructions below.
Note: If you are using FreePPP please skip over Config
PPP instructions to the FreePPP instructions.
1. After installing ConfigPPP (place the control panel in the control
panels folder in your system folder), open the ConfigPPP control panel by opening the
ConfigPPP control panel the "control panels" folder under your apple menu. You
should see a control panel resembling the graphic below.
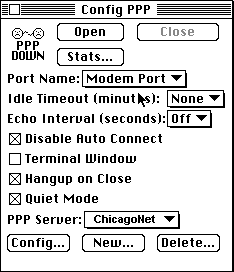
2. Once you are in the control panel click the "new" button
located at the bottom of the control panel. The next screen you will see should have the
text: "PPP Server Name:" located at the top. In the blank next to the text
input: ChicagoNet. Once you have input the text check the port speed (19200 if you have a
14.4 modem, or 38400 if you have a 28.8 modem, or 57600 if you have a 56k modem). Set the
flow control to None. Check the Tone Dial box and input the phone number (773-475-1501 in
Chicago). You may leave the modem init blank if you are unfamiliar with your particular
modems initialization string. Do not worry about the modem connect timeout, the default
setting should work correctly.
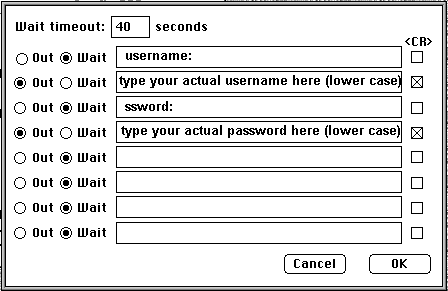
3. Click the "Connection Script" button located in the lower
left hand corner of your window. You should now have a window with the text: "wait
timeout" located at the top. Do not change the default of the wait timout seconds.
4. You should see "out" and "wait" radio boxes. Make
sure you set the Connection script exactly as shown in the graphic with the exception of
"your username" and "your password". Please input your personal
username and password in these blanks. Make sure you enter your username as "username@chicagonet.net". When you are done click the "OK" button
in the bottom right of the screen.
5. Once you’ve clicked "OK" you’ll be placed back
into the PPP server name window. Now, click the button labelled Authentication. You will
be prompted to place your userid (username) and Password in the blanks. When you are
finished click "Done". This will move you back to the PPP server name window.
Click "Done" and you will be moved out to the configPPP control panel. Now you
have finished setting up your configPPP control panel. When you want to make a new
connection just click "Open". When you are finished with your connection click
"Close".
Free PPP setup.
The following is the setup for FreePPP.
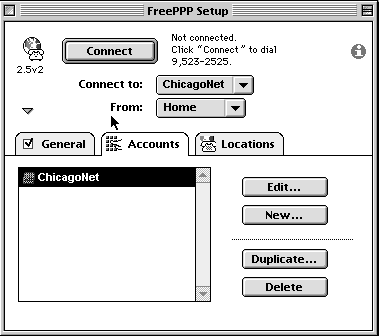
1. After you have installed FreePPP click on the new telephone icon located on the menubar
(it will be next to the "?" or finder). Drag down to the option "FreePPP
setup". Once you have selected FreePPP setup you will get the setup window.
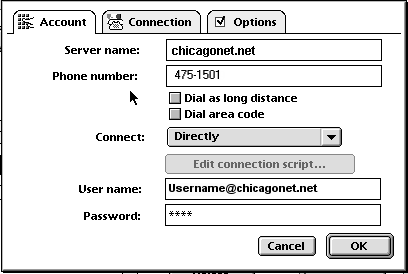
2. Click on the "Account" tab. Next, click on the "New
account" tab. Input the server name (chicagonet.net) and make sure the
"connect" is set to Directly. Next input the telephone number (475-1501 for
Chicago). Also input your personal username and password.
*After you click "New..."
3. Click on the "Connection" tab and check your port speed (19200
for 14.4 modems, 38,400 for 28.8 modems, 57,600 for 56K modems). Click on "OK"
That’s it!! You’re done!
|